Step 4: Population Growth Factors (Player Race)
Custom Race wizard / View Race dialog
Specify/view your race's habitable range and its growth rate under optimum conditions, using the following topics as guidelines:
Growth Conditions
Use this dialog to specify how well your race tolerates gravity, temperature and radiation. The tolerances are set individually for each of the three environmental factors.
The width of the colored bar represents the extent of the habitable range. The width plus the position of the bar left or right determine the extremes of the habitable range. The numbers to the right of the bar show the extremes in either gravities (g), degrees Celsius (°C) or millirads (mR).
Your race will grow only on planets with conditions that fall within the habitable ranges. On planets that are outside the habitable ranges, some colonists will die every year due to the unbearable conditions.
The gravity and temperature of every planet are picked at random, but are slightly weighted to favor values in the middle of the spectrum. If you move the colored bar away from the center, you will see the advantage points increase, compensating for the reduction in the number of habitable planets you will encounter. The radiation level of a planet is chosen completely at random.
Adjusting the Habitable Range
If you click on the ![]() or
or ![]() buttons, the entire range moves left or right. Holding down the SHIFT key while clicking moves the range in steps. Click and hold the colored bar to drag it back and forth freestyle.
buttons, the entire range moves left or right. Holding down the SHIFT key while clicking moves the range in steps. Click and hold the colored bar to drag it back and forth freestyle.
Clicking the ![]() button widens the habitable range. Clicking the
button widens the habitable range. Clicking the ![]() button narrows the habitable range. Holding down the Shift key while clicking narrows and widens the range in 20% increments.
button narrows the habitable range. Holding down the Shift key while clicking narrows and widens the range in 20% increments.
Choosing an Extreme Range
Cons: The more extreme your habitability range, the more planets will be out of your habitable and terraformable range.
Pros: You get back advantage points. Also, planets with environments near the ends of the spectrum have a good chance of being super-rich in one or more minerals. For example, a planet with a flesh-searing radiation extreme of 97mR could easily have four times the concentration of each mineral as a mild-mannered vacation world.
Immunity
Selecting the Immune to Radiation checkbox allows you to ignore an environmental factor. This is very expensive and will require the selection of many disadvantages to bring advantage points back above zero. When you select immunity, the habitable range becomes irrelevant and disappears. If you select any kind of immunity, you may not want to spend points on the Total Terraforming advantage. Once you're in the game, you can research individual terraforming technologies that apply only to environmental factors that can affect you. If you are totally immune, you never need to terraform.
Selecting immunity is different than expanding the habitable range to fill the entire spectrum. Immunity treats every point in the spectrum as 100% ideal. A range widened to fill the spectrum treats only the mid-point as 100% ideal. The edges of the range are 0% ideal.
Maximum Population Growth
Set the maximum colonist growth rate between 1% and 20% per year. The colonists will grow at this rate only if the planet value is 100%. If the planet value is less than 100%, the colonist growth rate will fall proportionately.
For example:
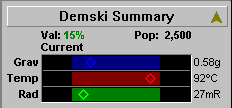
If your people decide to colonize Demski, a rock with a planetary value of 15%.

Clicking on the Value in the Selection Summary pane for the planet Demski displays this popup:

If you are immune to an environmental factor, every planet you explore will be 100% ideal for that factor. Immunity is expensive. You will have to choose many disadvantages in order to compensate and bring the advantage point value back above zero.
If you select both immunity to one or more environmental variables and the advantage of Total Terraforming, some or all of the points used to obtain the Total Terraforming advantage will be wasted.
When you know where and how you'll grow, go on to Step 5 and specify how efficient your race is at running your empire.

